Recipients
-
Introduction
The Recipients page is your address management hub within DPD Shipper, and provides easy access to all saved recipient data.
All recipients are listed here for quick reference and reuse. Individual entries can be edited or deleted, and multiple recipients can be selected to apply actions in bulk.
From this page, it’s also possible to create a new shipment order directly for a selected recipient, streamlining the order creation process.
This page also allows you to import and export recipient data, making it simple to manage larger address books or transfer data between systems efficiently.
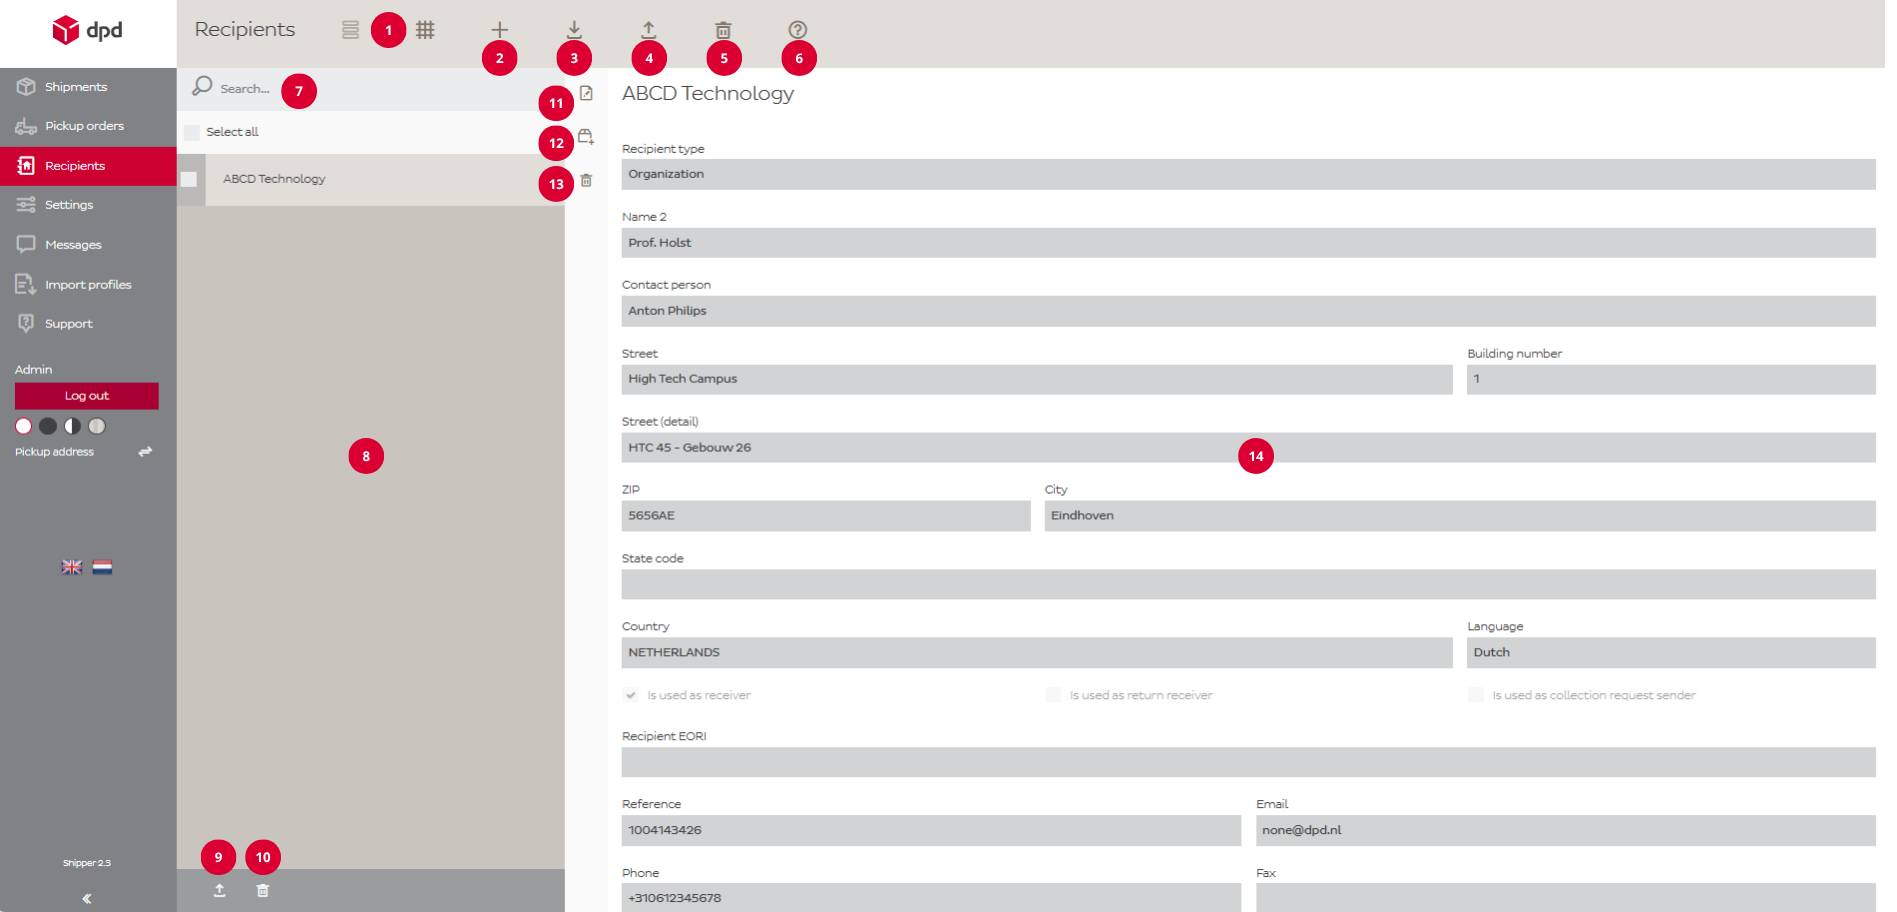
The image below displays numbered references to key menu items and buttons. Each number is explained in the sections below.
Click the image to open it full screen.
-
Top Menu (1 to 6)
The top menu gives you quick access to key functions for recipients in DPD Shipper. From here, you can create new recipients, import or export your recipients, and delete old recipients. The numbered tooltips below explain each option in more detail.
1. These buttons allows you to switch between a list view and a grid view, depending on your preference.
2. The “+ button” lets you create a new recipient.
3. The Import button lets you upload a complete address book into DPD Shipper from an external file using an import profile.
4. The Export button allows you to export the address book from DPD Shipper to your own computer for backup or use in other systems.
5. The Delete All Recipients button clears your whole address book.
(!)This action will permanently remove all saved recipients from your address book. This cannot be undone. Restoring the data is only possible by importing a previously saved backup.6. The FAQ button takes you directly to the Frequently Asked Questions page. There, you’ll find answers to common questions about using DPD Shipper.
-
Recipient Overview (7 to 10)
The Recipient Overview displays all recipients you’ve added so far. Use the search bar to quickly find specific shipments, and apply actions like export or delete one or multiple recipients at once. The numbered tooltips below explain each option in more detail.
7. The search field allows you to quickly find recipients within DPD Shipper. You can search by recipient name, address, reference number, and other key recipient details. It’s a fast and easy way to locate recipients you need without scrolling through the entire list.
8. The Recipients List section displays all recipients based on your current search criteria. After adding a recipient, it will appear here. From this section, you can open individual recipients to view details or make changes. It’s the central area where you manage all your recipients.
9. Click this button to export the selected recipients to a file. This is useful for creating a backup of your address book.
10. This button deletes the selected recipients from your address book. Use with caution, once removed, the recipient data is no longer available unless previously exported.
-
Recipient Details (11 to 14)
The Recipient Details section shows all relevant information for a selected recipient. Here you can view key details such as the name, street, email address and phone number. But you can also edit or delete the recipient or create a new shipment order for the recipient. The numbered tooltips below explain each option in more detail.
11. Click to edit the recipient details.
12. Create a new shipment order for the selected recipient.
13. This button deletes the recipient. Use with caution, once removed, the recipient data is no longer available unless previously exported.
14. This section shows key details such as the name, street, email address and phone number.
-
New Recipient
The New Recipient page contains all required fields to create and save a new recipient. Once completed and saved, the recipient will be added to the address book and appear on the Recipients page.
Field Mandatory Range Description Recipient Type Yes Single Choice Person for B2C. Organization for B2B. Name Yes Max. Length: 35 Name of the recipient. Name 2 No Max. Length: 35 Name2 of the recipient. Contact Person No Max. Length: 35 Recipient contact person. Street Yes Max. Length: 35 Street name of the recipient. Building number No* Max. Length: 8 House number of the recipient.
*Mandatory for The Netherlands.Street (detail) No Max. Length: 35 Additional information for the street of the recipient (e.g. floor or building). Country Yes Dropdown Menu The country of the recipient. Language Yes Dutch (NL)
English (EN)Language for communication to recipient. ZIP Yes Max. Length: 9 Postal code of the recipient. Format depending on destination country.
(!) Dutch postal codes must be entered in uppercase and without spaces (e.g. 5656AE).City Yes Max. Length: 35 Recipient city. State Code No Max. Length: 2 Only use for US States. Country code EORI number Yes Dropdown Receiver EORI country code. Recipient EORI Yes, for non-EU shipments Max. Length: 20 Receiver EORI number. Reference No Max. Length: 35 Reference of the recipient. Email Yes Max. Length: 100 Email address of the recipient. Country number Yes Dropdown Menu Prefix of phone number. Phone No* Max. Length: 30 Recipient phone number.
*Mandatory for shipments to the UK.Comment No Max. Length: 70 Recipient additonal comments. Recipient belongs to pickup address Yes Dropdown List of available pickup address to save the recipient to.