Shipments
-
Introduction
The Shipments page is your main dashboard, the same page as the overview page you’ll see upon entering DPD Shipper. From here, you can create new shipments and manage existing ones.
All your shipments – whether still in preparation or already printed – are listed here for easy access. You can edit, print, delete, or duplicate individual shipments, or select multiple entries to apply actions in one go.
This page also allows you to import and export shipment data in bulk, making it easy to handle larger volumes efficiently.
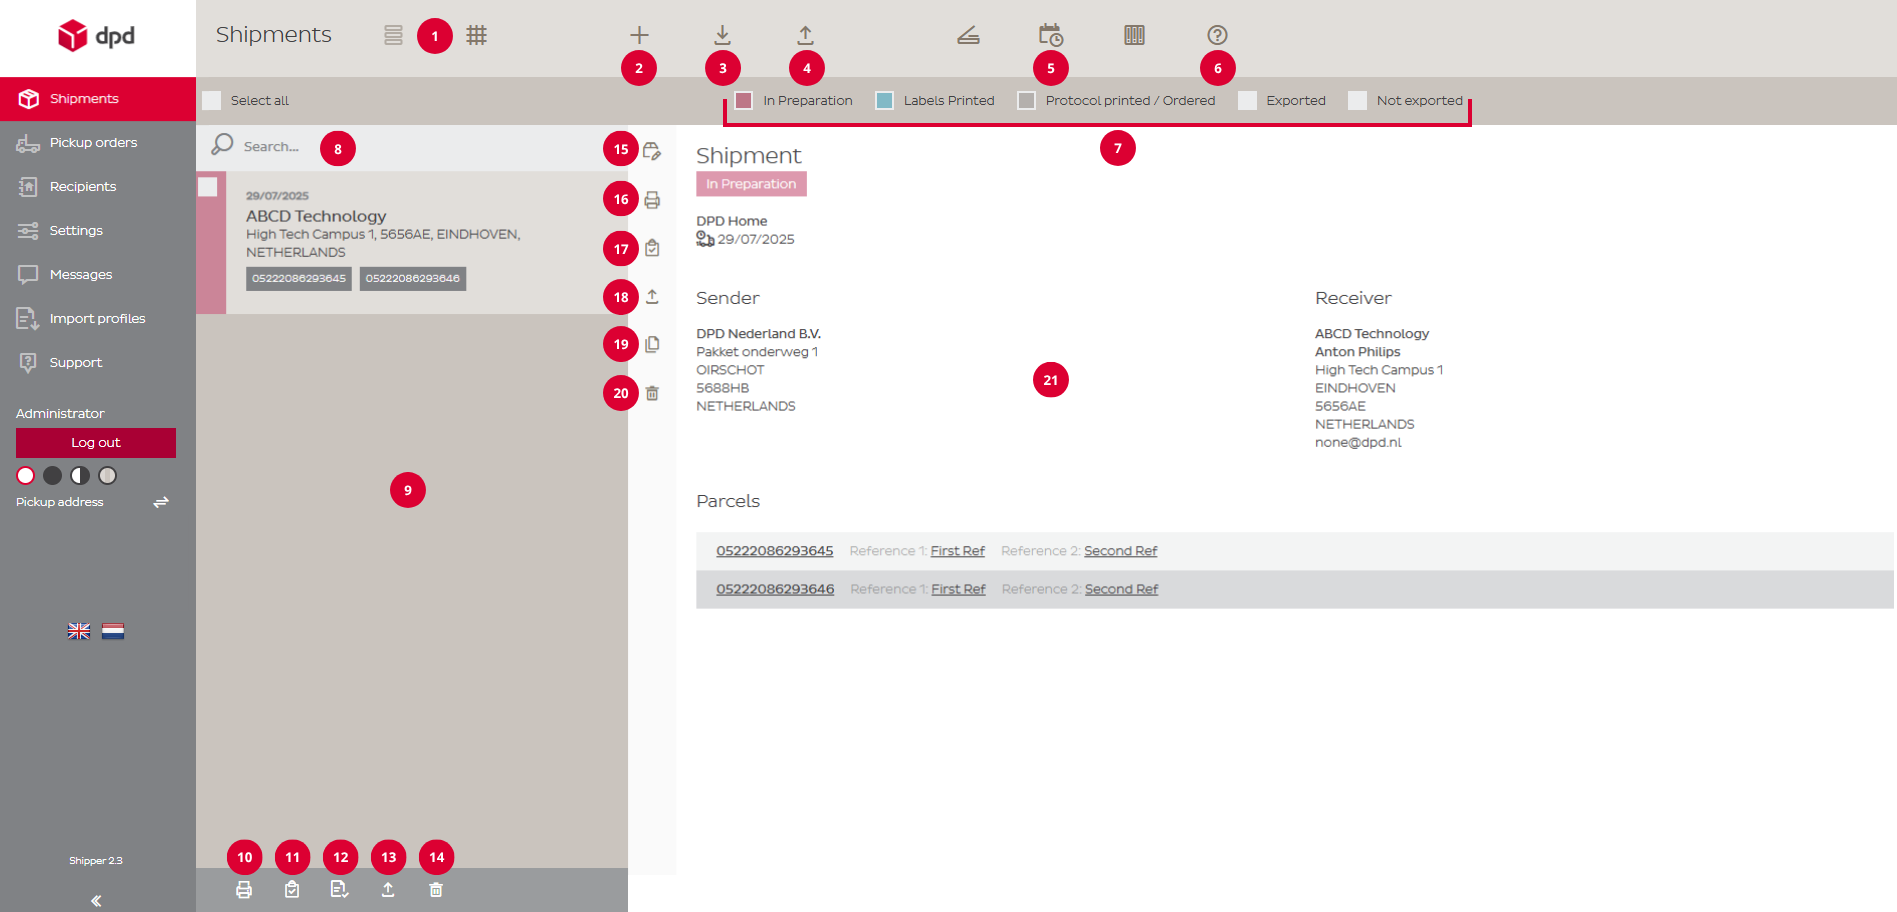
The image below displays numbered references to key menu items and buttons. Each number is explained in the sections below.
Click the image to open it full screen.
-
Top Menu (1 to 7)
The top menu gives you quick access to key functions for shipments in DPD Shipper. From here, you can create new shipments, filter your shipments, and finalize your shipment. The numbered tooltips below explain each option in more detail.
1. These buttons allows you to switch between a list view and a grid view, depending on your preference.
2. The “+ button” lets you create a new shipment (single or multi parcel). On the Shipments page, this is your starting point for entering shipment details and generating a new label.
3. The Import button lets you upload bulk shipments into DPD Shipper from an external file using an import profile.
4. The Export button allows you to export created shipments from DPD Shipper to your own computer for reporting, backup, or use in other systems.
5. The Daily Procedure button helps you complete the end-of-day processing for your shipments. It allows you to print shipping labels (if not already printed), generate a protocol (shipment list), and export shipment data (DPD Shipper Local).
6. The FAQ button takes you directly to the Frequently Asked Questions page. There, you’ll find answers to common questions about using DPD Shipper. For the most up-to-date information (user manual and FAQ), we refer to this DPD Knowledge Portal.
7. The status filters let you easily narrow down your shipment orders based on their current processing stage. You can filter shipments by statuses such as In Preparation, Labels Printed, Protocol Printed / Ordered, (Data) Exported, and (Data) Not Exported.
-
Shipment Overview (8 to 14)
The Shipment Overview displays all shipments you’ve created so far. Use the search bar to quickly find specific shipments, and apply actions like print or delete one or multiple orders at once. The numbered tooltips below explain each option in more detail.
8. The search field allows you to quickly find specific shipment orders within DPD Shipper. You can search by recipient name, address, reference number, and other key shipment details. It’s a fast and easy way to locate the orders you need without scrolling through the entire list.
9. The Shipment List section displays all shipment orders based on your current filters and search criteria. After creating a shipment, it will appear here. From this section, you can open individual shipment orders to view details, make changes, or print shipping labels. It’s the central area where you manage and monitor all your shipments.
Shipments can have three colours:
█ – The shipment has been created, but the label has not yet been printed (status: In Preparation).
█ – The label has been printed, but the shipment has not been finalized yet with the end-of-day procedure (status: Labels Printed).
█ – The shipment has been finalized (status: Protocol Printed).10. This button allows you to print shipping labels for the selected shipments in the list. Use this when you want to print labels for multiple orders at once.
11. Use this button to generate and print a protocol (shipment list) for the selected shipments. This is typically done after labels have been printed, as part of the daily shipping process.
12. This button prints the confirmation of the collection request for the selected collection requests. It’s comparable to the protocol for shipments.
13. Click this button to export the selected shipments to a file. This is useful for archiving, reporting, or integrating with external systems.
14. This button deletes the selected shipments from your list. Use with caution, once removed, the shipment data is no longer available unless previously exported or saved.
-
Shipment Details (15 to 21)
The Shipment Details section shows all relevant information for a selected shipment. Here you can view key details such as the sender and recipient information, parcel number, creation date, and chosen service. But you can also edit, print, duplicate or delete the shipment order. The numbered tooltips below explain each option in more detail.
15. Click to view or edit full shipment details. If you make changes to a printed shipment, its status will revert to In Preparation. Finalized shipments can only be viewed.
16. This button allows you to print the shipping label for the selected shipment.
17. Use this button to generate and print a protocol (shipment list) for this shipment. This is typically done after the label has been printed, as part of the daily shipping process.
18. Click this button to export the selected shipment to a file. This is useful for archiving, reporting, or integrating with external systems.
18. Create a new shipment by duplicating an existing one. You can edit the details before saving.
20. This button delete the shipment. Use with caution, once removed, the shipment data is no longer available unless previously exported or saved.
21. This section shows the status (e.g. Labels Printed) of the shipment, selected service (e.g. DPD Business or DPD Home), creation date, data transfer date/time, sender and receiver information, and all parcel numbers within the shipment. Each parcel number has a direct link to parcel tracking.