Easily upload your shipment data into DPD Shipper using an import profile and a structured data file. This page guides you through example files, creating import profiles, mapping fields, and using transformations to ensure a smooth shipment import.
Import Shipment Orders
-
Introduction
To get started, we recommend downloading our template files. These files provide a clear template for structuring your data correctly. Using these files will help prevent errors during import.
For a successful import, you need two files:
- An import profile
- A data file
The headers in your data file should match the import profile. For each shipment type, we provide these two files as a starting point.
Important! Adjusting the headers in the data file example will cause a mismatch with the import profile example. If the headers in the data file are adjusted, the import profile should be adjusted too.
Data File requirements:
- You can import a CSV file or a TXT file.
- Fields must be separated by a semicolon (;)
- Encoding must be UTF-8 (recommended), Windows 1252 or Windows 1250
- Data file must have a header line.
- Maximum 500 lines per data file.
- Country and language codes are in ISO 3166-1 alpha-2 format.
- E-mail addresses must have a valid domain/DNS.
- Field lengths cannot be exceeded.
-
Template Files
Regular Shipments
Regular shipments are:
- PL – ParcelLetter (154)
- B2B – DPD Classic (101/136)
- B2C – DPD Home (327/328)
- B2B-6 – DPD Classic Saturday (103)
- B2C-6 – DPD Home Saturday (358)
- B2B-AGE – DPD Age Check B2B (400)
- B2C-AGE – DPD Age Check B2C (404)
Import Profile Data File 
Including Track & Trace
If you want to send an email to the consignee once the order has been printed, please use these versions.Import Profile Data File 2Shop Shipments
The 2Shop shipments are deliveries to a Parcelshop or Locker. See our information page ‘Parcel Measurements & Weight’ for more information about measurements and weight for Parcelshops and Lockers.
The product code for the import profile is:
- PSD – DPD 2Shop (337/338)
Import Profile Data File Shop Return Shipments
With the Shop Return shipment, your customer returns their parcel to a Parcelshop or Locker to send it back to you. See our information page ‘Parcel Measurements & Weight’ for more information about measurements and weight for Parcelshops and Lockers.
The product code for the import profile is:
- RET – DPD Shop Return (332)
Import Profile Data File
Combination File
A combination file with a regular shipment (101) and a shop return shipment (332).Import Profile Data File International Shipments
International shipments include deliveries to non-EU countries such as Norway, Switzerland, UK and Liechtenstein. They also cover exceptional areas like the Canary Islands, Åland Islands, Campione d’Italia and Lake Lugano.
Import Profile Data File Collection Request
With a Collection Request, DPD collects the parcel and deliver it back to you (or another address).
Import Profile Data File -
Adding the Import Profile
The import profile tells the system how to interpret your data. It matches the column headers in your file with the correct fields in DPD Shipper. Before importing any shipment data, make sure to import or create the correct import profile first.
Use a predefined import profile (templates)
1. Download the import profile template that fits your use case.
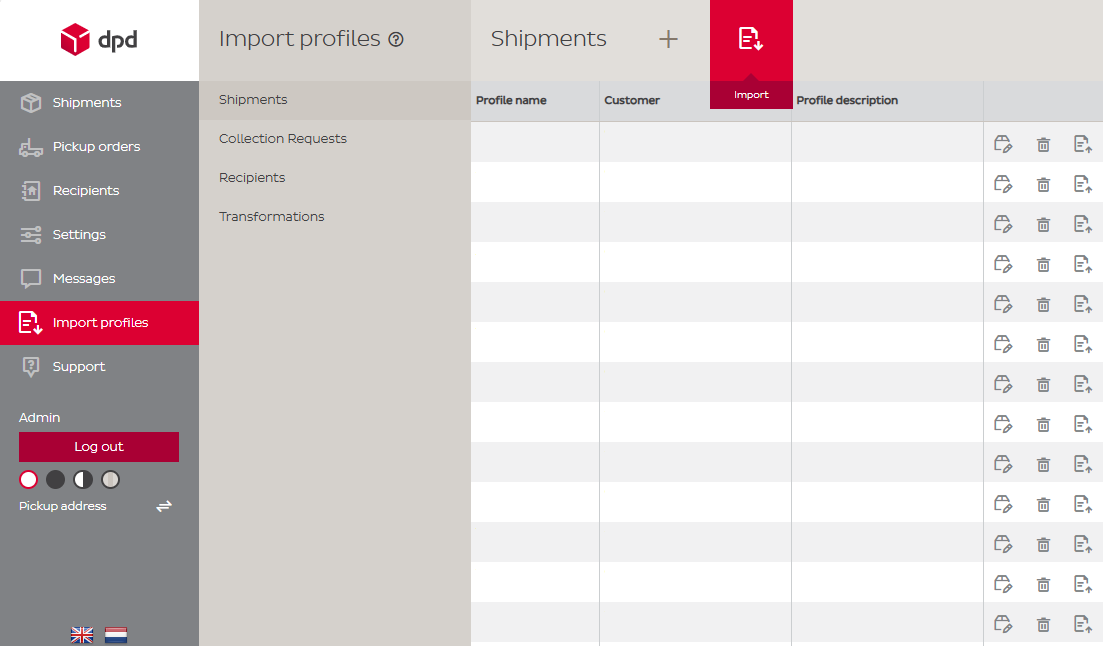
2. From the menu on the left, click ‘Import Profiles’ to open the import profiles overview.
3. From the submenu, choose ‘Shipments’ or ‘Collection Requests’ depending on the import profile you want to import.
4. Click on the ‘Import’ button in the top menu.
5. Click ‘Select File’ in the modal.
6. Select the template from your computer.
7. Click on the ‘Import’ button in the modal.
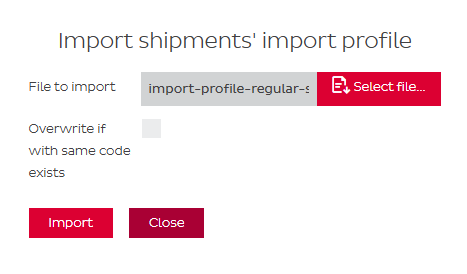
8. If you see the green succesful notification in the top right corner you can close the modal.
Create your own import profile (based on your own data file)
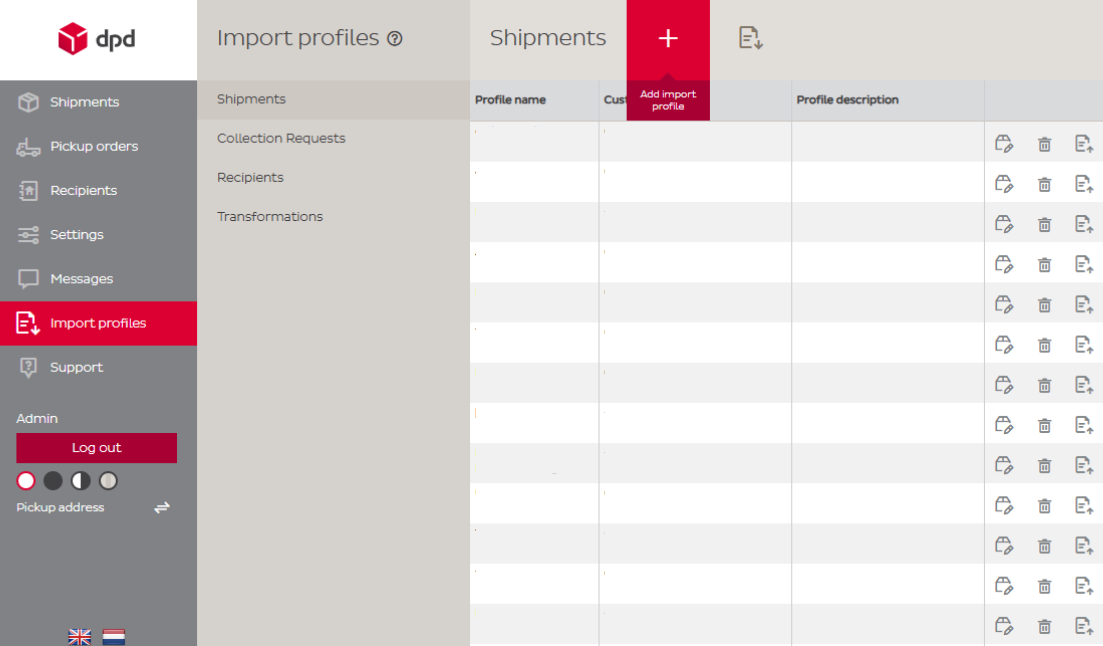
1. From the menu on the left, click ‘Import Profiles’ to open the import profiles overview.
2. From the submenu, choose ‘Shipments’ or ‘Collection Requests’ depending on the import profile you want to import.
3. Click on the ‘Add Import Profile’ button in the top menu.
4. Give your import profile a name that helps you recognize it later.
5. Enter a unique code of your choice.
6. Set the ‘Multiple Values Delimiter’ to
|so the system can separate values correctly.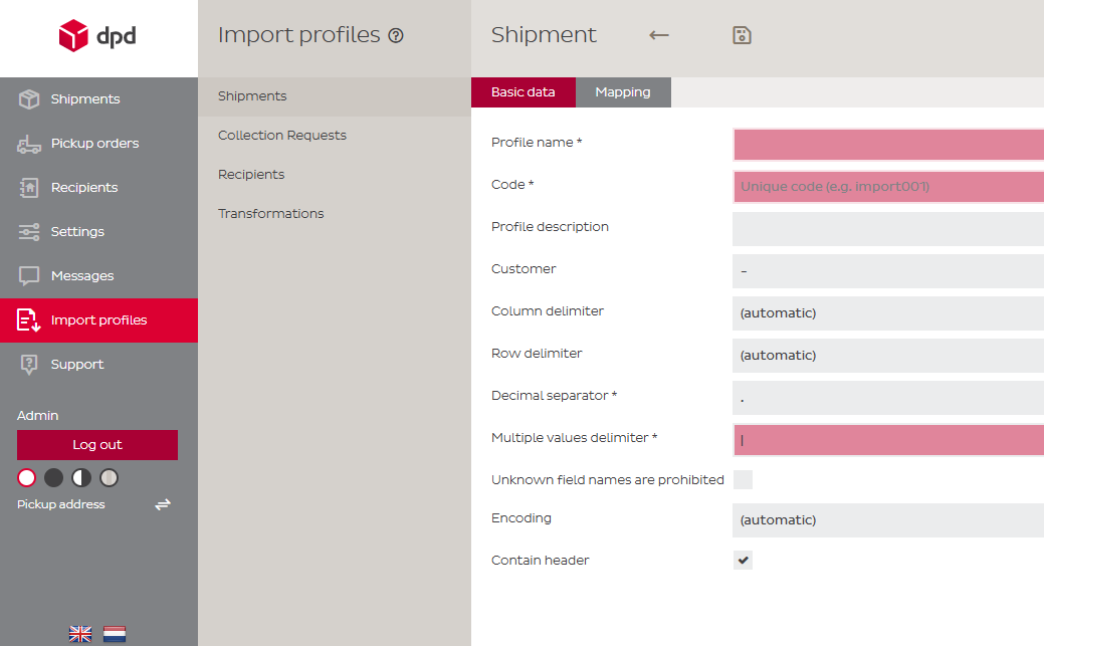
7. Go to the ‘Mapping’ tab.
8. Click the ‘Select File’ button to select your own data file.
9. Map the headers from your data file to the corresponding DPD Shipper fields using the dropdown menus. Fields marked with an asterisk (*) are mandatory.

10. Once all fields are mapped, click ‘Save’ at the top of the page. Your import profile is now ready to use for importing your data file
-
Importing the Data File
With your import profile ready, you can now import your data file with shipment orders. The system will use the import profile to match your file’s contents to the correct shipment fields. Make sure the structure of your data file matches the import profile exactly to avoid errors.
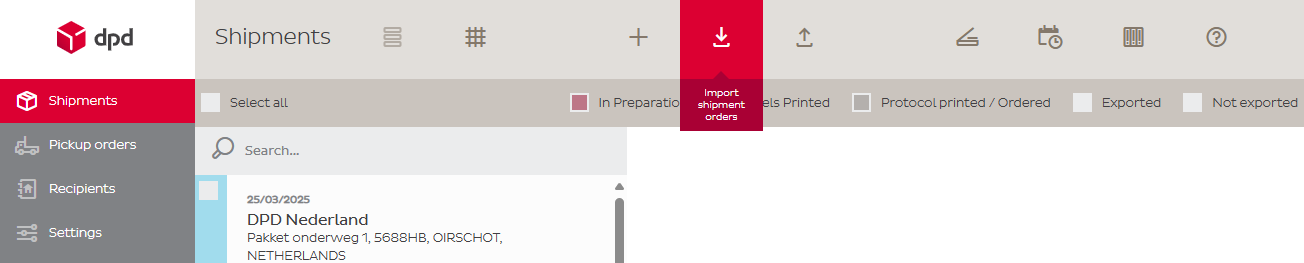
1. From the menu on the left, click ‘Shipments’ to open the shipment overview.
2. In the top menu, click ‘Import Shipment Orders’ to begin uploading your file.
3. In the modal, click ‘Select File’ to select your data file on your computer.
4. Select the data file on your computer.
5. In the modal, select the import profile under ‘profile’ that matches the content of your data file.
6. Optional: in the modal, click on ‘Validate’ to pre-check your data file with the selected import profile.
7. In the modal, click on ‘Import’ to import the shipments from your data file to DPD Shipper.
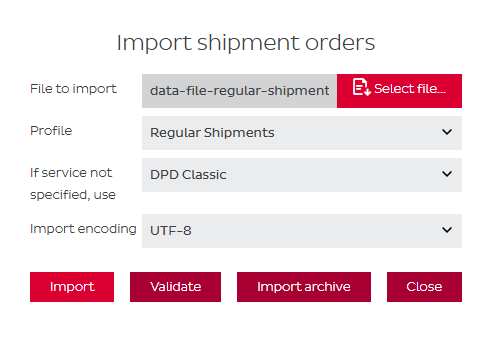
8. Optional: in the modal, click on ‘Import Archive’ to check the status of your import. If the import fails, you’ll find an error log on this page to help identify the issue.
9. In the modal, click on ‘Close’ to go back to the shipment overview page.
10. Refresh the shipments overview page to see your imported shipments.
-
Creating a Transformation
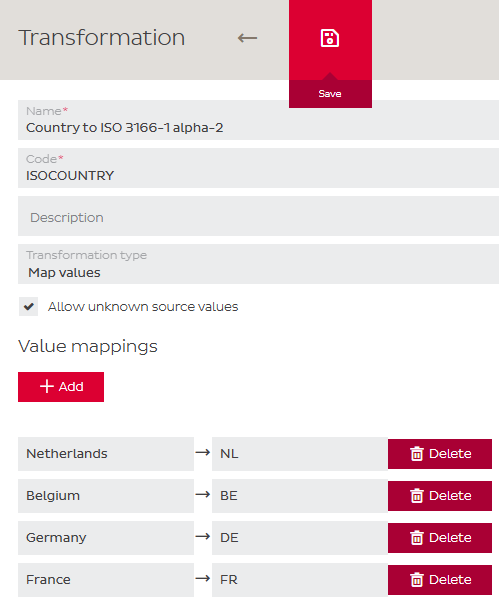
Transformations allow you to automatically convert the values in your data file into the format that DPD Shipper expects in the import profile. This is especially useful when your source data uses different codes, names, or formats than required by DPD Shipper. For example, if your data file contains full country names (like “Netherlands” or “Germany”), you can use transformations to automatically convert them into the correct ISO 3166-1 alpha-2 codes (“NL” or “DE”). No manual adjustments are needed in your data file.
Important! The values used for transformations must exactly match the data in your import file. Even small differences, like extra spaces or capitalization, can prevent the transformation from working correctly.
1. From the menu on the left, click ‘Import Profiles’ to open the import profiles overview.
2. In the sub-menu, click ‘Transformations’ to open the transformations page.
3. Click on the ‘Add’ button in the top menu.

4. Give your transformation a name that helps you recognize it later.
5. Enter a unique code of your choice.
6. Click on the ‘Add’ button to add a field for the input of your transformation.
7. Fill in your transformation in the input field. On the left the value from your data file (e.g. Netherlands), on the right the value that it should be (e.g. NL).
8. Once all fields are mapped, click ‘Save’ at the top of the page. Your transformation is now ready to be applied to your import profile.
9. Go to the import profile to apply the transformation. In the center column, select the transformation you want to use.

-
Creating a Data File
Don’t want to use a template or don’t have a data file yet? You can create your own file using the data fields listed in the documentation below. The field names correspond directly to the names used in the import profile.
Regular Shipments
These fields are the fields that are mandatory and recommended to create a basic data file, similar to the ‘regular shipments’ data file.Field Data Type Mandatory Range Description Recipient Section Name string Yes maxLength:35 Name of address owner. Street string Yes maxLength:35 Street of address owner. May also contain the house number if address validation is disabled. House nr. string No* maxLength:8 House number of address owner. *Only mandatory if not included in ‘Recipient – Street’ or when address validation is active. ZIP Code string Yes maxLength:9 Zip code of address owner. Without spaces or dashes. City string Yes maxLength:35 City/town of address owner. Country string Yes length:2 Country of address owner in ISO 3166-1 alpha-2 format. Phone string No* maxLength:30 Phone number of address owner. No required data format.
*Either phone or email is mandatory.Email string No* maxLength:50 Email address of address owner.
*Either phone or email is mandatory.Service Info Section Service Code string No B2B
B2C
PL
IE2Selection of product, exactly one per data line. Services string No AGE
6Selection of service, exactly one per data line.
AGE (= Age Check)
6 (= Saturday)Parcels Section Parcel Count number No maxLength:3 Amount of parcels in your shipment.
Default = 1Weight number Yes maxInclusive:
3150Parcel weight in decagrams units without decimal delimiter (e.g. 300 equals 3kg).
Information about maximum weight.Reference 1 string No maxLength:35 Parcel customer reference number 1.
This reference is visible on the label, on DPD Insights overview, on the CSV invoice in DPD Insights (configurable), within the Statusdata and on the POD.
Track & Trace
These fields are, in addition to the regular shipment fields, needed to send Track & Trace — similar to the ‘regular shipments including Track & Trace’ data file.Field Data Type Mandatory Range Description Customer Notifications Section Send Customer Notification number No 0
1Send track and trace email.
0 = No
1 = YesNotification Recipients string No maxLength:50 Email address of the receiver. Notification Language Code string No NL
ENLanguage of the email content in ISO 3166-1 alpha-2 format.
Only ‘NL’ and ‘EN’ possible.
2Shop Shipments
These fields are, in addition to the regular shipment fields, mandatory or recommended for creating a 2shop shipment — similar to the ‘2shop shipments’ data file.Field Data Type Mandatory Range Description Recipient Section Pickup ID string Yes length:7 Selection of product, exactly one per data line. Service Info Section Service Code string Yes PSD Selection of product, exactly one per data line.
Shop Return Shipments
These fields are, in addition to the regular shipment fields, mandatory or recommended for creating a shop return shipment — similar to the ‘shop return shipments’ data file.Field Data Type Mandatory Range Description Sender Address Section Name string Yes maxLength:35 Name of address owner. Street string Yes maxLength:35 Street of address owner. May also contain the house number if address validation is disabled. House nr. string No* maxLength:8 House number of address owner. *Only mandatory if not included in ‘Recipient – Street’ or when address validation is active. ZIP Code string Yes maxLength:9 Zip code of address owner. Without spaces or dashes. City string Yes maxLength:35 City/town of address owner. Country string Yes length:2 Country of address owner in ISO 3166-1 alpha-2 format. Phone string No* maxLength:30 Phone number of address owner. No required data format.
*Either phone or email is mandatory.Email string No* maxLength:50 Email address of address owner.
*Either phone or email is mandatory.Service Info Section Service Code string Yes RET Selection of product, exactly one per data line.
International Shipments
These fields are, in addition to the regular shipment fields, mandatory or recommended for creating an international shipment — similar to the ‘international shipments’ data file.Field Data Type Mandatory Range Description Customs Clearance Section Sender EORI Number string No* maxLength:20 *If sender is a business, then either EORI or vatNumber is mandatory.
Sender VAT Number string No* maxLength:20 *If sender is a business, then either EORI or vatNumber is mandatory.
Recipient EORI Number string No* maxLength:20 *If receiver is a business, then either EORI or vatNumber is mandatory.
For UK: The receiver EORI number field is always mandatory. For a B2C shipment, fill in the sender EORI number, since B2C receivers don’t have an EORI number.Recipient VAT Number string No* maxLength:20 *If receiver is a business, then either EORI or vatNumber is mandatory.
For UK: The receiver VAT number field is always mandatory. For a B2C shipment, fill in the sender VAT number, since B2C receivers don’t have a VAT number.Terms of Delivery
Non UKstring Yes length:2 Declares the customs terms. Possible values are:
01: DAP (Delivered At Place), Cleared. Handling cost charged to shipper, duties & taxes charged to recipient
02: DDP (Delivered Duty Paid), duties paid and taxes unpaid
03: DDP (Delivered Duty Paid), duties and taxes paid
05: Ex Works (EXW)
06: DAP (Delivered At Place / DAP NP), handling cost, duties & taxes charged to recipientTerms of Delivery
UK Onlystring Yes length:2 Declares the customs terms. Possible values are:
06: DAP (Delivered At Place / DAP NP), handling cost, duties & taxes charged to recipient
07: DDP (Delivered Duty Paid / DAP DP), duty paid, tax paid, only applicable for UKType of Documents string No maxLength:20 Lists the accompanying documents. The values are to be combined without separator (e.g. “ABG”).
Following values are defined:
A: commercial invoice
B: pro forma invoice
C: export declaration
D: EUR1
E: EUR2
F: ATR
G: delivery note
H: third party billing
I: T1 documentParcel Type string Yes length:1 Always set this value to P. Clearance Cleared string Yes length:1 Always set this value to N. Pre-alert Status string Yes length:3 Always set this value to S03. Invoice Currency Code string Yes length:3 Currency code in ISO 4217 alpha-3 format. Invoice Number string Yes maxLength:20 Defines the invoice number. Invoice Issue Date string Yes YYYYMMDD Defines the invoice date. Export Reason string Yes length:2 Reason for export.
01: sale
02: return/replacement
03: giftInvoice Line – Content string Yes maxLength:35 Describes the content of the parcel.
For multi-item shipments, use the pipe symbol (|) as a separator.
e.g. Item 1|Item 2.Invoice Line – Tariff Number string Yes maxLength:8 The customs tarif number (HS code) of the item.
For multi-item shipments, use the pipe symbol (|) as a separator.
e.g. 52010010|52010090.Invoice Line – Number of Items string Yes maxInclusive:
9999Quantity of the item.
For multi-item shipments, use the pipe symbol (|) as a separator.
e.g. 2|5.Invoice Line – Amount string Yes maxInclusive:
99999999Defines the customs amount in total without decimal separator (e.g. value 1234 = 12.34).
For multi-item shipments, use the pipe symbol (|) as a separator.
e.g. 795|1250.Invoice Line – Gross Weight string Yes maxInclusive:
3150Total weight of this item. If you have multiple items in the data line, Gross Weightshould add up toParcel Weightin the data line.
For multi-item shipments, use the pipe symbol (|) as a separator.
e.g. 300|200.Invoice Line – Origin Country Code string Yes length:2 Origin country in ISO 3166-1 alpha-2 format.
For multi-item shipments, use the pipe symbol (|) as a separator.
e.g. NL|BE.
Collection Requests
These fields are, in addition to the regular shipment fields, mandatory or recommended for creating a shop return shipment — similar to the ‘collection request’ data file.Field Data Type Mandatory Range Description Sender Section Pickup Date string Yes YYYYMMDD Defines the pickup date of the collection request. Customer Reference Nr string No maxLength:35 Collection Request customer reference number. This reference is used in DPD Insights. Sender Address Section Name string Yes maxLength:35 Name of address owner. Street string Yes maxLength:35 Street of address owner. May also contain the house number if address validation is disabled. House nr. string No* maxLength:8 House number of address owner. *Only mandatory if not included in ‘Recipient – Street’ or when address validation is active. ZIP Code string Yes maxLength:9 Zip code of address owner. Without spaces or dashes. City string Yes maxLength:35 City/town of address owner. Country string Yes length:2 Country of address owner in ISO 3166-1 alpha-2 format. Phone string No* maxLength:30 Phone number of address owner. No required data format.
*Either phone or email is mandatory.Email string Yes maxLength:50 Email address of address owner.
Other Fields
In addition to the required and recommended fields, there are several optional fields you can include in your data file. These fields offer extra flexibility and allow you to provide more detailed shipment information.Field Data Type Mandatory Range Description Recipient Section Recipient Type string No maxLength:1 B = Business
P = PrivateName 2 string No maxLength:35 Name 2 of address owner. Contact Person string No maxLength:35 Contact person of address owner. Street 2 string No maxLength:35 Street2 of address owner. Can be used to specify building, apartment or door. State string No length:2 US only! State of address owner in ISO 3166-2 code. Sender Address Section Company Name string No maxLength:35 Company Name of address owner. Name 2 string No maxLength:35 Name 2 of address owner. Contact Person string No maxLength:35 Contact person of address owner. Street 2 string No maxLength:35 Street2 of address owner. Can be used to specify building, apartment or door. State string No length:2 US only! State of address owner in ISO 3166-2 code. Parcels Section Dimensions integer No maxInclusive:
999999999Volume of the single parcel (length/width/height in format LLLWWWHHH) in cm without separators.
Information about maximum volume.Reference 2 string No maxLength:35 Parcel customer reference number 2.
This reference is visible on the label, on DPD Insights overview, on the CSV invoice in DPD Insights (configurable) and on the POD.Reference 3 string No maxLength:35 Parcel customer reference number 3.
This reference is visible on DPD Insights overview and on the CSV invoice in DPD Insights (configurable).Reference 4 string No maxLength:35 Parcel customer reference number 4.
This reference is visible on DPD Insights overview and on the CSV invoice in DPD Insights (configurable).