New Shipment Creation
-
Introduction
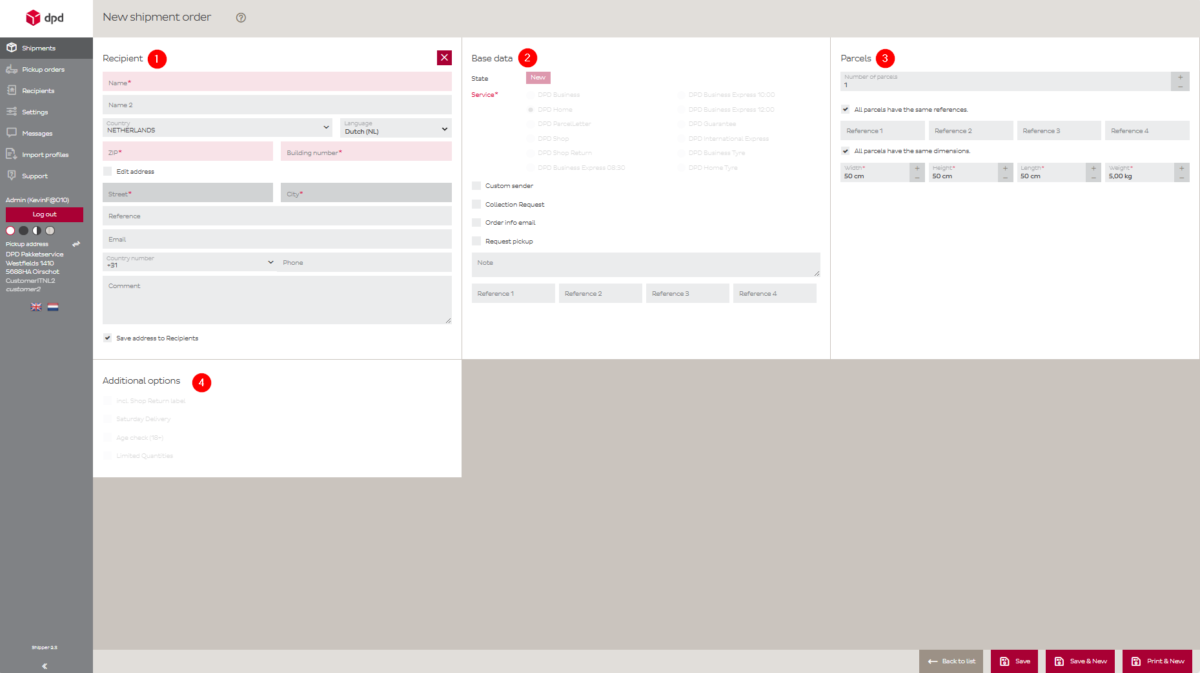
The new shipment page provides all the necessary fields to create a new shipment. In clearly structured sections, sender and receiver details, parcel information, the service and additional options can be entered. This ensures a complete and valid shipment.
Once all data is provided and validated, a shipping label can be generated and printed (as PDF) immediately. This page serves as the central point for preparing single an multi parcel shipment. It is a key part of the overall shipping workflow within DPD Shipper.
The page has 4 main sections:
1. Recipient
2. Base Data
3. Parcels
4. Additional OptionsAnd the following additional sections:
• Custom Sender
• Collection Request
• Customs Data (including Parcel Contents)The four main sections
-
Recipient Section
The Recipient Section includes all details about the shipment’s destination and contains the following data fields.
Street (detail)NoMax. Length: 35Additional information for the street of the receiver (e.g. floor or building).
Field Mandatory Range Description Name Yes Max. Length: 35 Name of receiver.
Tip: This field acts as a search field for your address book.Name 2 No Max. Length: 35 Name2 of receiver. Contact Person No Max. Length: 35 Receiver contact person. Country Yes Dropdown Menu The country of the receiver. Language Yes Dutch (NL)
English (NL)Language for communication to receiver. Street Yes Max. Length: 35 Street name of the receiver.
Auto-generated for The Netherlands.Building number No* Max. Length: 8 House number of the receiver.
*Mandatory for The Netherlands.ZIP Yes Max. Length: 9 Postal code of the receiver. Format depending on destination country. City Yes Max. Length: 35 Receiver city.
Auto-generated for The Netherlands.Reference No Max. Length: 35 Reference of the receiver. Not printed on the label. Email Yes Max. Length: 100 Email address of the receiver. Country number Yes Dropdown Menu Prefix of phone number. Phone No* Max. Length: 30 Receiver phone number.
*Mandatory for shipments to the UK.Country code EORI number Yes Dropdown Receiver EORI country code. Recipient EORI Yes, for non-EU shipments Max. Length: 20 Receiver EORI number. VAT nr Yes Max. Length: 20 Receiver VAT number. Comment No Max. Length: 70 Receiver additonal comments. Save address to recipients No Checkbox Check if the receiver should be save in the address book of DPD Shipper. -
Base Data Section
Service
Select the DPD service to be used for this shipment.- DPD Business for B2B and Collection Requests
- DPD Home for B2C
- DPD ParcelLetter for small parcels up to 1kg
- DPD Shop for delivery to a parcelshop or locker
- DPD Shop Return for a return label
- DPD Business Express 8:30/10:00/12:00/Guarantee for express deliveries
- DPD International Express for shipments we cannot cover by road (e.g. islands)
- DPD Business Tyre/Home Tyre for B2B or B2C tyre shipments
Custom sender
Enable this option to override the default sender details on the label and in the shipment data. Useful for replacing the standard address with, for example, a brand name or alternative address. For more information, see 6. Custom Sender Section.Collection request
Instead of sending a parcel, this option allows a pickup to be scheduled from another location. Either returning to you or delivered to a third address. For more information, see 7. Collection Request Section.Order info e-mail
Enable this to send a basic tracking notification email to the recipient (not the DPD Predict email). This email includes the parcel number and reference, and is triggered when the label is printed. Choose between the message in Dutch (NL) or English (EN). Fill in one email address in the ’email recipients’ field.Request Pickup
Select this option during shipment creation to request a single-parcel pickup for the next business day. For multiple pickups, use the dedicated ‘Pickup Orders‘ page. This is only necessary if you do not have a fixed pickup arrangement with DPD.Note
Optional note for the driver.Reference 1–4
The amount of reference can vary based on the settings within DPD Shipper.- Reference 1: Visible in DPD Predict notifications, on the POD, and optionally on the CSV invoice in DPD Insights.
- Reference 2: Shown on the Proof of Delivery (POD), and optionally on the CSV invoice in DPD Insights.
- Reference 3–4: Internal use only, not shown on labels or in notifications.
-
Parcels Section
Enter the details for each parcel in the shipment.
Number of parcels
Specify how many parcels are included in the shipment.
Important! For UK this is a maximum of 1.Reference 1–4
Enter the reference for parcels. The amount of reference can vary based on the settings within DPD Shipper.Select the option ‘All parcels have the same references’ if the reference fields (1 to 4) should be applied to all parcels in the shipment. This prevents the need to enter them individually for each parcel. Deselect this option if parcels have different references.
These references are used for tracking and reporting purposes.
- Reference 1: Visible on the label, Proof of Delivery (POD), on DPD Insights overview page, optionally on the CSV invoice in DPD Insights and in the Statusdata.
- Reference 2: Visible on the label, Proof of Delivery (POD), on DPD Insights overview page and optionally on the CSV invoice in DPD Insights.
- Reference 3-4: Shown on the DPD Insights overview page and optionally on the CSV invoice in DPD Insights.
Weight & Dimensions
Enter the width, height, length and weight for parcels.Select the option ‘All parcels have the same dimensions’ if the weight & dimension fields should be applied to all parcels in the shipment. This prevents the need to enter them individually for each parcel. Deselect this option if parcels have different weight and dimensions.
See our information page ‘Parcel Measurements & Weight’ for more information about maximum weight and dimensions.
-
Additional Options Section
This section includes optional services that may be available depending on your contract. These settings apply per shipment and can be enabled when relevant.
- Incl. Shop Return Label: Generates a return label alongside the shipment label. Useful for enabling easy returns via DPD Parcel Shops.
- DPD Saturday Delivery: Ensures the shipment is delivered on a Saturday. Only available in specific regions and for specific service types.
- DPD Age check : Adds an age verification requirement upon delivery. Suitable for shipments containing restricted goods, such as alcohol or age-sensitive products.
- Limited Quantities: Used when shipping limited quantities of dangerous goods. Ensure that packaging and labeling meet applicable regulations.
-
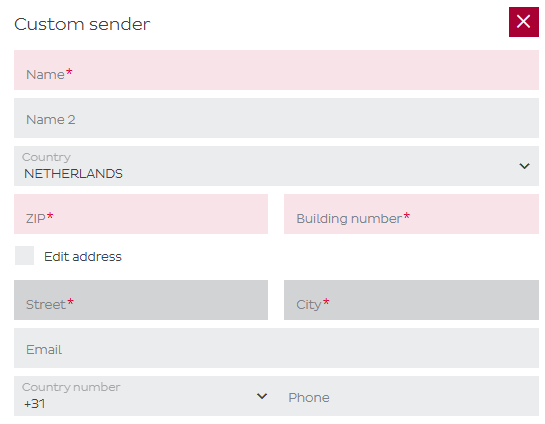
Custom Sender Section
This section becomes available when the ‘Custom sender’ option is enabled in the ‘Base Data’ section. This option is used to override the default sender details on the label and in the shipment data. Useful for replacing the standard address with, for example, a brand name or alternative address.
Street (detail)NoMax. Length: 35Additional information for the street of the sender (e.g. floor or building).EmailYesMax. Length: 100Email address of the sender.
Field Mandatory Range Description Name Yes Max. Length: 35 Name of sender.
Tip: This field acts as a search field for your address book.Name 2 No Max. Length: 35 Name2 of sender. Country Yes Dropdown Menu The country of the sender. Street Yes Max. Length: 35 Street name of the sender.
Auto-generated for The Netherlands.Building number No* Max. Length: 8 House number of the sender.
*Mandatory for The Netherlands.ZIP Yes Max. Length: 9 Post code of the sender. Format depending on destination country. City Yes Max. Length: 35 Sender city.
Auto-generated for The Netherlands.Country number Yes Dropdown Menu Prefix of phone number. Phone No Max. Length: 30 Sender phone number./td> -
Collection Request Section
A collection request works as an ‘inverted’ shipment: instead of sending a parcel to a consignee, a DPD driver is instructed to collect a parcel from a specified location (point A). This parcel is then delivered either to your own address (point B) or to another address of your choice (point C). Once the request is created, there’s no need to print the label. DPD will handle that. The parcel must be properly prepared and ready for pickup. During collection, the driver will label and scan the parcel before transporting it to the depot, where it is injected into the DPD network for delivery.
Create a Collection Request
To create a collection request, start by creating a shipment as any standard shipment. In the ‘Base Data’ section, select the option ‘Collection Request’.If recipient details have already been entered, these will automatically be set as the Collection Request Sender. If no details are filled in yet, the Collection Request Sender information can now be completed manually. When the parcel should not be returned to the sender’s own pickup address, the option ‘Send to my pickup address’ can be deselected. Recipient details can then be entered accordingly. Both sections have the same fields as the standard ‘Recipient’ section.
Within the ‘Base Data’ section, select a pickup date other than today. For some countries (e.g. France, Finland, Sweden, Denmark) it is by default the next day and the date cannot be altered. The daily cut-off time for submitting collection requests to ensure next-day processing is 22:00 CET. Collection requests cannot be scheduled for national holidays.
Within the ‘Parcels’ section, the amount of parcels should be given. Providing the parcel weight is optional, as it may not be known in advance. However, an estimate is appreciated.
Important! Unlike standard shipments, which are not charged if the label is never scanned by DPD, a Collection Request is considered a definitive order once it has been saved. After saving, you cannot cancel a collection request from DPD Shipper. You need to contact Customer Service on 0499-339991 to do so. Please have your account number, name, customer reference, collection request address, time and date of the order ready when doing so.
-
Customs Data Section
This section – including the ‘Parcel Contents’ section, is used to enter customs information for shipments destined outside the EU customs zone, such as the United Kingdom, Norway, or Switzerland. These sections appear automatically based on the selected country and ZIP code in the ‘Recipient’ section.
Customs Data
Field Mandatory Range Description Shipment Type Yes Dropdown The type of the shipment. Reason for export Yes Dropdown The reason for export. Choose ‘Sale’, ‘Return/Replacement’ or ‘Gift’ based on the purpose of your shipment. Terms of delivery Yes Dropdown DAP (Delivered At Place / DAP NP), handling cost, duties & taxes charged to recipient.
DDP (Delivered Duty Paid / DAP DP), duty paid & tax paid. Only applicable for UK.Invoice number Yes Max. Length: 20 Defines the invoice number. Invoice date Yes Calendar Defines the invoice date. Export MRN No Max. Length: 20 Movement reference number of the electronical export declaration. Comment No Max. Length: 70 Comment about your shipment. Sender HMRC number No* Max. Length: 20 *Mandatory if value of goods meets HMRC requirements. HMRC number of the sender. UK only. Country code EORI number No Dropdown Receiver EORI country code. Sender EORI No Max. Length: 20 Sender EORI number. Sender VAT No Max. Length: 20 Sender VAT number. Parcel Contents
Field Mandatory Range Description Nature of goods Yes Max. Length: 35 Description of the item. HS-code Yes Length: 8 The customs tarif number (HS code) of the item. Amount Yes Total value of this item. Gross weight Yes Total weight of this item.
(!) If you have multiple items in the shipment, gross weight should add up to weight in the ‘Parcels’ section.Quantity Yes Quantity of the item. Country of origin Yes Dropdown Origin country of the item. Additional invoice lines No Select the number of different items in the parcel.
Fill out the information above for each item. -
Export Documentation (Dutch)
As an example in this Dutch video, we explain what needs to be filled out to export a parcel to the UK flawlessly.
Important! Some fields in DPD Shipper are marked as optional while they must be filled mandatory. See all mandatory fields in this overview of mandatory fields.
For complete specifications and handy links for exporting a parcel, see the following Dutch Manuals:
-
Saving and Printing the Label
At the bottom of the page, three options are available to save or print the shipment:
- Save: Saves the shipment and returns to the Shipments Overview page. The label can be printed later from the Shipments Overview page.
- Save & New: Saves the current shipment and immediately opens a new shipment creation form. The label can be printed later from the Shipments Overview page.
- Print & New: Downloads the shipping label as a PDF to your computer and opens a new shipment creation form. For automatic printing of the PDF on your label printer, see “automatic label printing on label printer“.
Shipper Local: Shipper Local can print the label as ZPL on your label printer.
-
Automatic Label Printing on Label Printer
Shipping labels are generated and saved as PDF files. While these can be printed manually, many customers prefer to use dedicated label printers for faster and more efficient processing.
To support this, DPD offers a script that enables automatic printing of PDF labels directly to a connected label printer, streamlining the workflow and reducing manual steps.Disclaimer: This script is not an official DPD product and is provided solely as a practical example for customers who wish to automate label printing. DPD does not offer support or guarantees for this script. For improvements, troubleshooting, or further assistance, please contact your own IT department or IT service provider.
How it works:
- The first time you run the script, a window will appear with all available printers. Choose your label printer. This selection will be saved and used automatically next time.
- The script monitors your Downloads folder.
- When a PDF starting with
05or20is found, it is automatically printed and then moved to theprintedsubfolder. - You will see a notification popup when a print job is sent.
Setup:
1. Save the script below as DPDLabelPrinter.ps1 on your computer.
2. Open PowerShell as administrator.
3. Run this command once (if not done before):Set-ExecutionPolicy -Scope CurrentUser -ExecutionPolicy RemoteSigned4. Go to the folder where you saved the script:
cd "C:\path\to\your\script"5. Run the script:
.\DPDLabelPrinter.ps1Script: DPDLabelPrinter.ps1
# Configuration
$downloads = [Environment]::GetFolderPath("UserProfile") + "\Downloads"
$printedFolder = Join-Path $downloads "printed"
if (!(Test-Path $printedFolder)) { New-Item -ItemType Directory -Path $printedFolder | Out-Null }

$prefixes = @("05", "20")

# Function to show popup notification
function Show-Notification($message) {
Add-Type -AssemblyName PresentationFramework
[System.Windows.MessageBox]::Show($message, "DPD Label Printer", 'OK', 'Info')
}

# Select Printer (only first run)
function Select-Printer {
$printers = Get-Printer | Select-Object -ExpandProperty Name
Write-Host "Select the printer to use for DPD labels:"
$printers | ForEach-Object { Write-Host "$($_): $($_)" }
$printerName = $printers | Out-GridView -Title "Select your label printer" -OutputMode Single
return $printerName
}

# Save/Load selected printer
$printerFile = Join-Path $printedFolder "selected_printer.txt"
if (Test-Path $printerFile) {
$printerName = Get-Content $printerFile
} else {
$printerName = Select-Printer
if ($null -eq $printerName -or $printerName -eq "") {
Show-Notification "No printer selected. Script will exit."
exit
}
Set-Content -Path $printerFile -Value $printerName
Show-Notification "Printer '$printerName' will be used for DPD labels."
}

# Print PDF with specific printer
function Print-PDF($pdfPath, $printerName) {
Start-Process -FilePath $pdfPath -ArgumentList "/p /h /t$printerName" -WindowStyle Hidden
}

Write-Host "Monitoring $downloads for DPD shipping labels..."

while ($true) {
$labels = Get-ChildItem -Path $downloads -Filter "*.pdf" | Where-Object {
$name = $_.Name
$prefixes | Where-Object { $name.StartsWith($_) }
}
foreach ($label in $labels) {
try {
# Print to selected printer
Start-Process -FilePath $label.FullName -ArgumentList "/p /h" -Verb PrintTo -WindowStyle Hidden
Start-Sleep -Seconds 2
Show-Notification "Print job sent: $($label.Name)"
Move-Item $label.FullName -Destination $printedFolder
} catch {
Show-Notification "Error printing: $($label.Name)`n$_"
}
}
Start-Sleep -Seconds 5
}
Note:
- Make sure your printer can print PDFs directly.
- If you need to change the selected printer, delete the file selected_printer.txt in the printed folder and restart the script.