Automatic Importing, Printing and Exporting
-
Import profiles
We have updated the import profile information on the DPD Shipper Central knowledge page. The process is identical for DPD Shipper Local. So for updated instructions and template files, go to: https://integrations.dpd.nl/dpd-shipper/dpd-shipper-central/import-shipment-orders/.
DPD Shipper enables you to import shipments, collection requests and receivers.
This allows you to process a whole lot of data in a fast way.
For example, you can load the address file from other software into DPD Shipper, or you can create hundreds of shipments at once.You can import from an excel file, a csv file or a txt file.
Fields in csv or txt files must be separated with pipe (|) or semicolon (;) and the encoding must be UTF-8, Windows 1252 or Windows 1250 and a header line is recommended.To successfully import you must:
1- Create a valid import file
The import file contains all information about the shipments; where should be sent, with which product, how many packages and how heavy they are, …2- Create import profile
With an import profile you can “map” the columns in your file with the fields in DPD Shipper.3- Create transformation (optional)
With a transformation you can transform data from your file into data that Shipper can interpret.
For example: Countries need to be in ISO format (country code). If the countries in your file are indicated as Belgium, the Netherlands, …, you can convert them to BE, NL, … by making a transformation. This step is only needed if there are details that need transforming.1.1 Import file creation
To be able to import you need an import file with all the details of your shipments.
DPD Shipper can import CSV, TXT or XLSX files, but CSV or TXT are strongly recommended.
The fields must be separated by a semicolon (;) or a pipe (|) and a header line is strongly recommended. The order of the columns doesn’t matter.The following fields can be used when creating the import file for shipments.
Mandatory means the field must always contain a value. Criteria means it’s only mandatory in certain cases, Optional means it’s never mandatory.
The system can also be assigned fixed values for certain fields if you can’t include them in your CSV, TXT of XLSX file. These fixed values will then be used for each shipment.
Header is strongly recommended
The order of the columns doesn’t matter.
The table below lists available columns for a shipment import file.
Column Length Data type Field type Description id_address_sender 6 number O To identify sender address assignment of import shipment orders. If not set in the file, default sender address is used. Identifier allocated from DPD Shipper admin in configuration file. delisid 10 string O To identify correct configuration for shipment orders assignment recipient type 1 string O Type of recipient (B – B2B, C – B2C), default: C recipient_name 35 string M Recipient name 1 recipient_name2 35 string O Recipient name 2 (contact person) recipient_street 35 string M Recipient street recipient_house_no 8 string O House number of the recipient recipeint_street2 35 string O Detail of street recipient_zip 9 string M Recipient ZIP code recipient_city 35 string M Recipient city recipient_state 2 string O State within the recipient country (applicable for USA and Canada), e.g. CA for California recipient_country 3 number M Recipient country (ISO 3166) recipient_language 2 string O Language of notifications for recipient MSG:LANG (SK, CZ, EN, DE, FR, ITA) recipient_phone 30 string C Recipient telephone number in international format recipient_fax 30 string O Recipient fax number in international format recipient_email 50 string O Recipient e-mail address recipient_note 70 string O Recipient note recipient_reference 35 string O Recipient reference number recipient_information 150 string O Information/instruction for delivery to courier device (POD) to displayed product 10 string M Internal product ID (D, PM2, AM1, AM2, AIR…) services 255 string O Internal IDs of all Services (COD, SWAP, SMS, 6, TYRE, IDC…) nops 255 string O Internal IDs for desired additional operation (NOP) (SMS, …) parcel_count 3 number O Count of parcels, default: 1 parcel_SWP_count 2 number C Number of parcels for return (if different than parcels number heading of recipient) default: same as parcel count, of 1 criteria: =< parcel count parcel_volume 9 number C Parcel volume (length/width/height) in cm without separators; In case of different volume per parcel, separate values by comma (,). Default: from setting. parcel_weight 8 number M Parcel weight in grams rounded in 10 without decimal delimiter (e.g. 300 equals 3 kg); In case of different weight per parcel, separate values by comma (,) parcel_note 100 string O Note for parcel parcel_note_back 100 string O Note for parcel (back) parcel_reference1 35 string O Parcel reference number 1 parcel_reference2 35 string O Parcel reference number 2 parcel_reference3 35 string O Parcel reference number 3 parcel_reference4 35 string O Parcel reference number 4 pickup_id 6 number O Delivery to PICKUP point, global reference number of place. pickup_date 6/8 string O Date in two supported formats yymmdd or yyyymmdd ATTENTION! If you open the files in a spreadsheet application such as MS Excel, numerical values that start with 0 (e.g. telephone number) are usually converted so that the 0 falls off. You can prevent this by importing the values as text instead of numbers.
1.2 Import profile creation
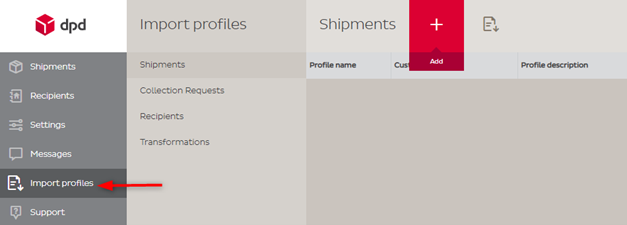
With the help of an import profile you can assign the columns in your import file to the fields that Shipper uses. To create an import profile, go to à Import Profiles on the left, choose between Shipments, Collection Requests or Recipients, and then click → Add.
In the next screen you can enter the parameters of your file.
Profile Name: a free name you can give to your import profile. It doesn’t matter what you fill in but it can’t be blank.
Code: a free code you can give to your profile. As above, it doesn’t matter what, but it can’t be blank.If your file does not contain a header line you must check this before you go to the next step! You can set further details like Profile description, Column delimiter, Row delimiter, Encoding. If the import file contains header, thick Contain header check box. You can leave most of the fields here automatically.

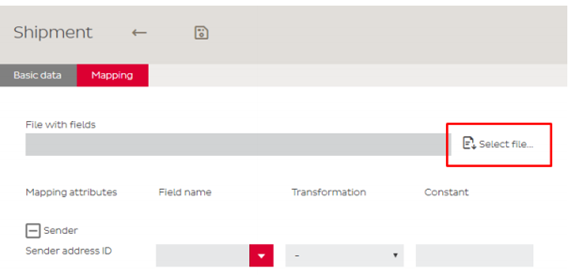
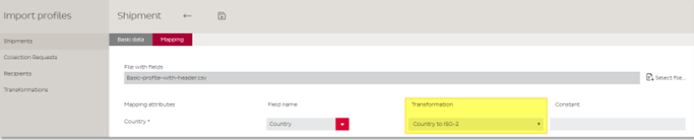
Once you have entered the parameters, click on Mapping at the top. Here you can assign the columns to a field value. To start, click on Select file and select file to map into import profile, click “open”.
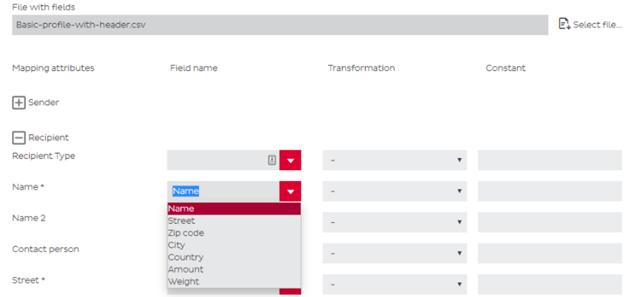
There are 3 options for assigning fields:
Field name – Link a column from your file with the correct field in Shipper.
Transformation – Transform a value from your file into a value that Shipper can use. Look at transformations for detailed explanation.
Constant – will instantly rewrite the values from imported file into Shipper DB on import action. If your packages are always 5 kilos you can give that here as a fixed value.
Mandatory fields can be recognized by the asterisk *. If file was uploaded, a dropdown menu will be next to each field, in which user will select field name from file, which corresponds to the Mapping attribute. If the file was not uploaded first, user must write field names manually.
For finishing and saving the import profile assign the required fields, or set constant value and click “Save” button.
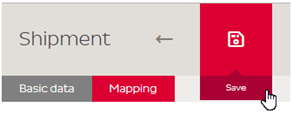
NOTE: If mandatory fields or constants were not filled, the “Save” button will not be active!
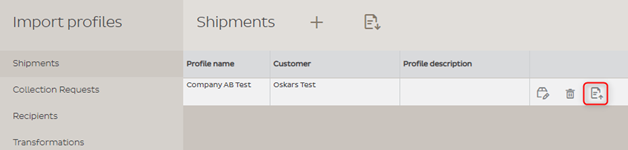
Click on Import profiles in the navigation panel on the left and the saved profile will appear in the list view. There are three action buttons in the list view “Edit”, “Delete” and “Export”.

IMPORTANT
- Weights must always be given in decagram (5 kg = 500)
- Countries must be included in ISO-2 format (BE, LU, NL, …), they are in your file otherwise you can use a transformation
- If you do not use a header, you must assign the columns with the column number that starts from 0
- If you want to use the same import profile again in the future to import another Excel or CSV file, this is possible but only if your Excel or CSV file has the same structure as set up in the profile.
1.3 Import profile exporting
Once you have created import profile, it is strongly recommended to make a backup of it just in case. To do so click on the Export button. After clicking, download of the file will be initiated immediately.
1.4 Import profile importing
Importing Import profiles is done by clicking on import button in top part of the screen.
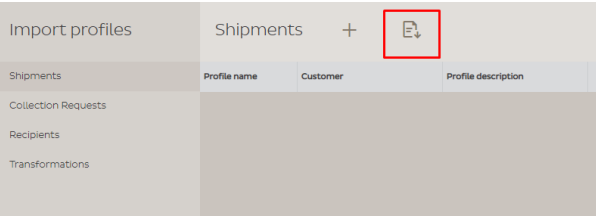
Then, user have to select file to import and click on import button.
-
Transformation creation
With the help of transformations, you can convert values that are in your import file to values that DPD Shipper can use.
To create a transformation, go to à Import profile àTransformations and Add in the left menu.
In the screen that appears you give your transformation a name and a code, a description is optional.
With the button Allow unknown source values you allow that values can also be imported that have not been converted.At “Value mappings” you click on “+Add” to add values.
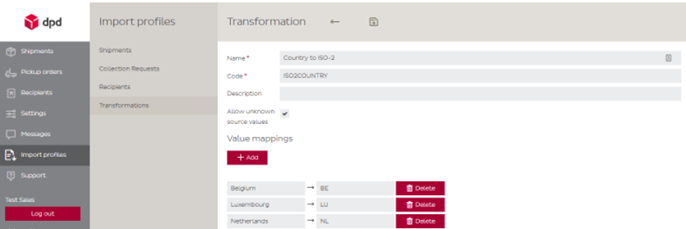
Afterwards you go back to your created import profile to assign the transformation to the correct field.
-
Manual importing/exporting
The Shipper allows you to import a list of shipments, collection requests and recipients from third-party applications and also importing files in CSV format.
There are restrictions for correct structure of the files, find DPD import manuals for the import file structure in the attachments XXXXXXXXX
There is a possibility to include comments within your import file: .CSV file add sharp (#) character on the beginning of the comment row # Your comment … .XML file Comments are ignored by import mechanism.
Character encoding for both formats is UTF-8 without BOM. If you have problem with special characters while importing files, like “C, ý, T, Ž” etc. Check format of your file. If you are using Excel and you want to import CSV file, it will probably have problem with these characters, because of default Excel encoding for CSV file, which is ANSI. Then, open your CSV file via notepad (right click file in file explorer, hover over Open with… and select Notepad), the click Save As, select your desired path and for encoding select UTF-8.
3.1 Manual shipments import
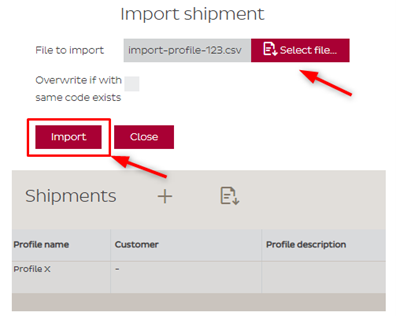
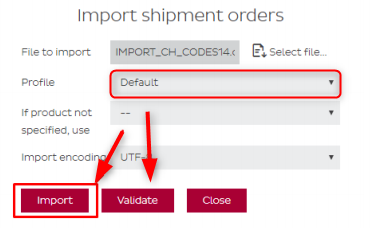
Go to → Shipments click on → Import shipment orders button.
→Select file button and choose the file for import and click on “Open” button.
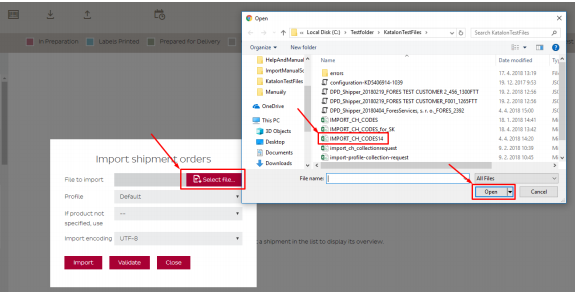
Choose the → Profile , click on → Validate and → Import botton.
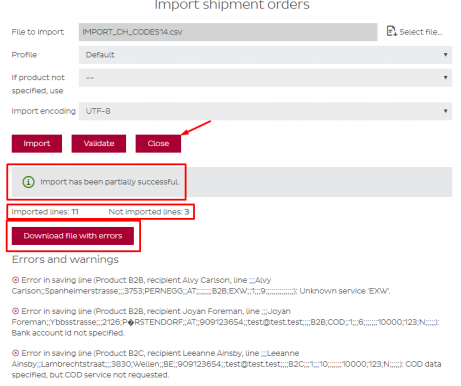
After import is finished, success/error message is displayed with number of Imported lines/Not imported lines. If some error has occurred, you can Download file with errors, else you can just close the window by clicking on Close.
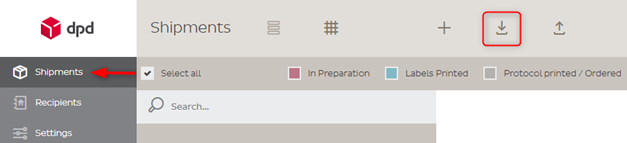
3 .2 Manual shipments export
DPD Shipper application has the functionality to be able to export all parcels from shipments into a single file OR export parcels from selected shipments.
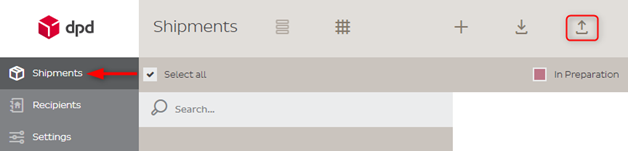
To export all shipments into a single file go to → Shipments click on → Export shipment orders button.
System is generating CSV export a few seconds, after that, parcels export in a CSV file is automatically downloaded.
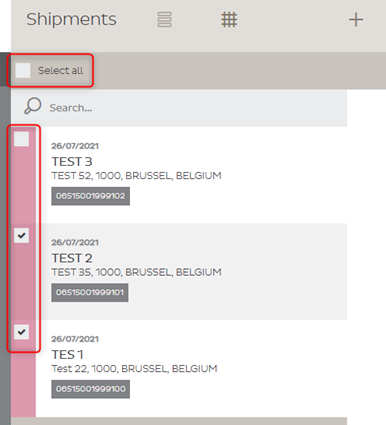
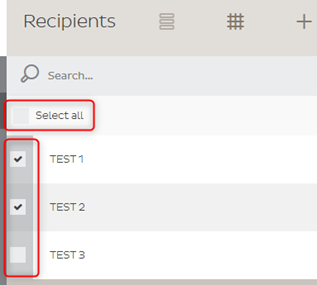
To export parcels from selected shipments, select shipments you want to export. You can select shipments by ticking checkbox next to the shipment OR you can elect all shipments that are listed on current page by ticking Select all checkbox. Make sure at least one Collection Request is checked.
To export selected shipments, click on the export icon at the bottom of the screen under shipments.

After clicking on Export shipments icon, shipments export is generated a few seconds and after is downloaded in CSV file. If Collection Request shipment was ticked, there are two files downloaded, one that contains CRs and the other that contains normal shipments.

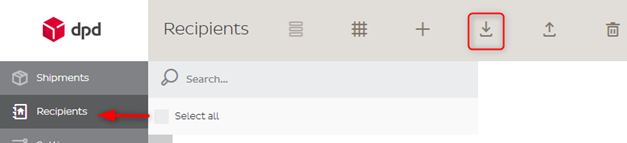
3.3 Manual recipients import
Go to → Recipients click on → Import recipients button.
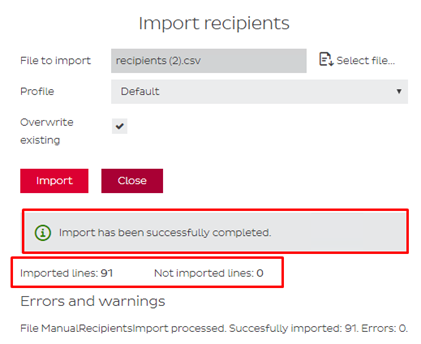
→ Select file button and choose the file for import and click on Open button. Choose the → Profile and → Import botton.

NOTE: The “Overwrite existing” check box only overwrites recipients that have the identical reference, same recipients without any reference will be duplicated.
Check the confirmation message for eventual errors. Close the Import recipient window by clicking on Close.
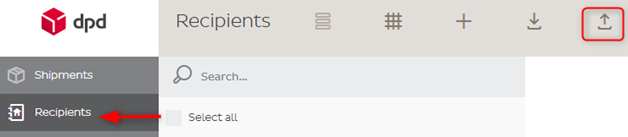
3.4 Manual recipients export
DPD Shipper application has the functionality to be able to export all recipients into a single file OR export recipients from selected recipients list.
To export all recipients into a single file go to → Recipients click on → Export recipients button.
In the dialog window, select your desired format of the export file and click on whether you’ve chosen Export to IXML or Export to CSV.
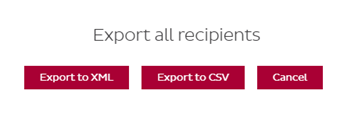
After clicking on Export to XML/CSV, windows is closed and download is initiated.
To export recipients from selected recipients list, either, select some recipients you want to export by ticking checkbox next to them or tick Select all checkbox to select all recipients on the page.
In the dialog window, select your desired format of the export file and click on whether you’ve chosen Export to IXML or Export to CSV.

After clicking on Export to XML/CSV, windows is closed and download is initiated.
-
Automatic importing/exporting
DPD Shipper application has the functionality to be able to import files generated by 3rd party applications in automated manner. Based on the settings, import procedure can be performed automatically in cyclic manner according to desired preferences.
Import shipments service can access only network accessible shared folders. Path to this folder must be set in the relevant fields.
4.1 Automatic shipments import
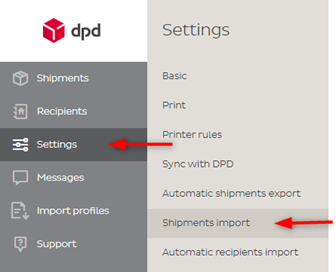
For setting up, the automatic shipments import go to Settings → Shipments import
- Thick the automatically import shipments box, if you want to let DPD Shipper perform this action periodically.
- Type the path to the folder into the field.
- Set periodicity for automatic import and set further details according to your preferences.
- Click “Save”.
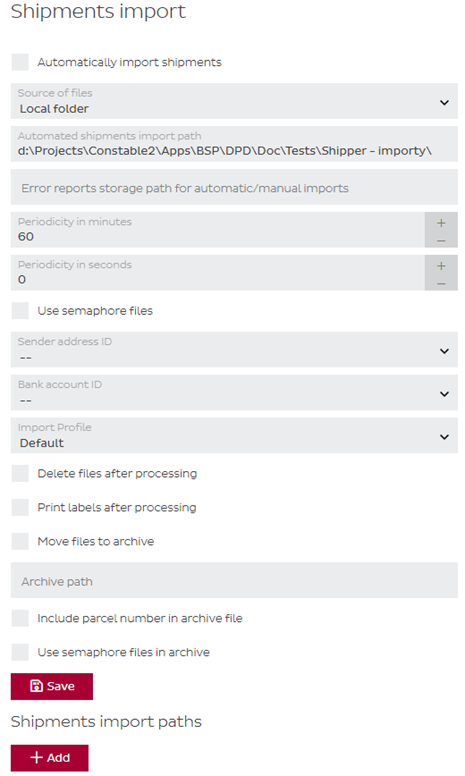
IMPORTANT: For transparent and smooth automatic import shipment operation management, it is possible to set up error report storage and archive folder in DPD Shipper.
To enable archiving, check Move files to archive and select archive path in settings. You can also check Include parcel number in archive file which will include parcel numbers within archived file or check Use semaphore files in archive to create .sem file also.
To enable error report storage, type the path to the folder Error reports storage path for automatic/manual imports.

4.2 Automatic shipments export
For setting up, the automatic shipments export go to Settings → Automatic shipments export
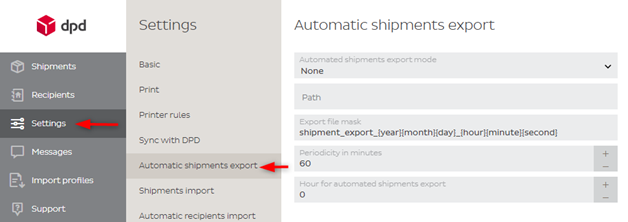
- Type the path to the folder into the field.
- Set periodicity for automatic export and set further details according to your preferences.
- Click “Save”.
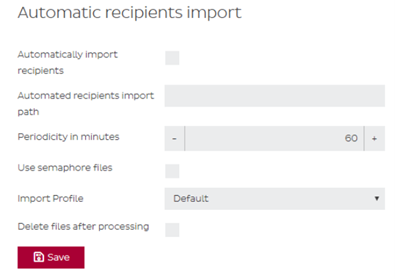
4.3 Automatic recipients import
For setting up, the automatic recipients import go to Settings à Automatic recipients import
- Thick the check box for automatic import of the recipients, if you want to let DPD Shipper perform this action periodically.
- Type in the path to the folder for Automated recipients import path field.
- Set periodicity for automatic import and set further details according to your preferences.
- Click “Save”.